I love to travel, see new places, experience different cultures and of course eat local food. Before I came to England my girlfriend Nicole and I traveled for 2 months in South East Asia. One of the countries on the trip was Cambodia. We went during the rainy season but it wasn't all that bad, just a down pour for about 10-15 minutes cooling things off for a bit. There were beautiful old temples all over. Of course when you go to a country where tourism is a source of income to some people the hagglers come out trying to sell you a book or map of the temples which is usually way over priced. But to me it's all about the experience and they are just trying to make a living.
There is lots of history there as well with the Khmer Rouge regime which were most known for carrying out genocide. We visited many of the killing fields on our trip and it was quite disturbing at times. But overall Cambodia was a really nice place and I thoroughly enjoyed my time there and would love to go back.
The people were really friendly -
The tuk-tuks were fun and scary
And the food was delicious!!
This is all leading somewhere I swear. One of the dishes I really liked while there was called Lok Lak. It is a very simple meal of meat and rice but packed with some great flavors. So here it is...
Beef Lok Lak
300 grams of beef cut into strips (I used a sirloin and rib eye)
1 medium onion sliced into wedges
1 tbsp EVOO
Marinade
3 cloves garlic minced
2 tbsp oyster sauce
2 tbsp soy sauce
1 tbsp fish sauce
1 tsp sugar
1 tbsp ketchup
1 tsp fresh cracked black pepper
1 tbsp lemon juice
Pepper Sauce
1/2 lime juiced
1 garlic clove minced
1 tsp fresh cracked black pepper
pinch of salt
pinch of sugar
In a medium sized bowl mix all the ingredients of the marinade. Add the beef strips making sure each piece is coated and let sit for 45-60 minutes.
While the flavors are getting to know each other, whip up the pepper sauce. Throw all the ingredients in a small bowl and give a mix, set aside.
Heat the EVOO in a sauce pan, add the onions and cook for 2 minutes. Add the beef and marinade to the onions cooking for 5 minutes or so depending on how you well done you like it. Remove from heat and let sit for a couple minutes to thicken.
Serve over a bed of lettuce and a side of rice with the pepper sauce. Sliced cucumbers could also be added as a garnish.
Wednesday, February 23, 2011
Lok Lak - Cambodian cuisine
Wednesday, February 16, 2011
Chicken Chimichangas
Since living here in Bristol, England, people have asked me what food I miss most from back home. Well of course I miss some of my mom's good homemade cooking, nothing can beat that, but besides that there are a couple of things I miss - Mexican and good Sushi. Yes I know a weird combination but it's what I like. There are a few sushi places here but they don't even compare to back home, not quite as many choices for rolls. That is next on the list to make. No Mexican restaurants here though. Sometimes I just feel like going out and looking at a menu full of tacos, chimichangas, burritos and sides of refried beans and rice. And to top it off would be some salt, tequila and lime.
I make tacos every now and then but I wanted something different. So as my mouth watered for weeks I browsed through the world wide web and came upon the food blog www.cinnamonspiceandeverythingnice.com/ and found a chimichanga recipe. It looked delicious and I couldn't wait to give it try. I made a few changes so here is my version.
Chicken Chimichangas
2 tablespoons unsalted butter
4 tablespoons vegetable oil
1 onion chopped
4 cloves garlic minced
1 green chili chopped finely (I left the seeds in mine but remove for less heat)
1 1/2 teaspoons chili powder
1 teaspoon ground cumin
1/4 teaspoon ground cinnamon
S+P
1 small tomato, chopped, plus more for topping
2 tablespoons chopped fresh coriander (cilantro)
3 chicken breast - shredded or cut into cubes
1/4 cup sour cream
1 - 15-ounce can refried beans
4 - 10-inch flour tortillas
1 cup shredded cheese (I used irish cheddar extra mature and double gloucester since there is nothing here like a montery jack)
Toppings:
Shredded lettuce
Sour cream
Spring onions
Shredded cheese
Tomatoes
Avocado
I wanted shredded chicken, chunks would work just fine too, so I baked the chicken breast at 375º F for 15-20min or until done. Take 2 forks - with 1 of them hold the chicken breast down and the other start to pull/tear the chicken away lengthwise.
Next preheat the oven to 450º F. Melt the butter with 2 tablespoons of vegetable oil in a skillet; transfer to a bowl. Heat the remaining 2 tablespoons oil in the skillet and add the onion, garlic and green chili. Cook over medium-low heat until soft. Add the chili powder, cumin, cinnamon and 1 teaspoon salt, give a stir for about 30 seconds to let the flavors come together. Add the tomato and coriander and cook for a few minutes. Stir in the chicken and sour cream cooking until warmed. Remove from heat.
Brush a rimmed baking sheet with some of the butter-oil mixture. Spread approximately 2 tablespoons of refried beans down the center of each tortilla (depending on how big they are), leaving a 2-inch border on both ends. Top with 1 cup chicken mixture and 1/4 cup cheese. Be careful not too add too much filling. Fold in the ends and roll up.
Place the chimichangas seam-side down on the baking sheet and brush with the butter-oil mixture. Bake 8 to 10 minutes per side, brushing again after you flip.
Add toppings of your choice and serve with rice.
Saturday, February 12, 2011
Pork Chops with Blueberries
I have been looking to cook something different lately and decided to search through some of the cookbooks Nicole got me for Christmas. I was looking through this Italian book The Silver Spoon (which is about 1100 pages) trying to decide what protein I was in the mood for. I knew I had some pork chops in the fridge so I started in that section just to see if there was anything that made my tastes buds start watering. So I came across the pork chops with blueberries recipe which I thought sounded good. Plus I just happened to have some blueberries that I bought from the veg store earlier.
Pork Chops with Blueberries
4 pork chops
plain flour for dusting
25g/1 oz butter
3 tbsp olive oil
175 ml red wine
300g blueberries
100g honey
S+P
Preheat the oven to 400º. To make life a little easier pass the blueberries through a food mill. I didn't have one of those so I improvised and put them in a sieve and used the back of a spoon to mash them into a bowl. Add the honey to the blueberries and give a stir.
Dust the pork chops in the flour. Heat the butter and oil in an oven proof sauce pan. Add the chops to the pan and cook on both sides until browned. Pour in the wine and cook until it has partly evaporated, then season with salt and pepper. Take the blueberry mixture and pour over the chops and place in the oven to cook for 15 minutes. Remove and let sit for 5 minutes. I served mine with roasted parsnips and carrots sprinkled with rosemary and a cabbage and cucumber salad with an Asian dressing I whipped up (lime juice, fish sauce, soy sauce, palm sugar and rice wine vinegar).
This turned out to be really good, the sweetness of the sauce was a great flavor. I will definitely make this again.
Tuesday, February 8, 2011
Risotto ai Funghi e Pancetta
Risotto is a fairly new dish for me. I don't know why I hadn't tried to make it before. I think I've had it in a restaurant a few times but must not have been to impressed. My girlfriend and I went to another couples house for dinner a while back and we had risotto (thanks Brooke) which was quite tasty. Now, being that cooking is an enjoyable hobby of mine, this gave me something new to try and make. There are lots of different ingredients you can add to risotto so I wanted to put my spin on it.
This is an easy dish to make so give it a go and be creative with yours.
Serves 3-4 (depending if you go for seconds or want leftovers)
Risotto ai Funghi e Pancetta
250 grams of arborio rice (about 1 1/4 cups)
2 tbsp of extra virgin olive oil
1 cup of pancetta diced
1 medium onion diced
3-4 garlic cloves finely chopped
8 button mushrooms quartered (Another option would be dried porcini mushrooms)
1/2 cup dry white wine
2 tbsp of butter
3/4 cup of Parmesan cheese
1 liter of hot chicken or vegetable stock
In a large pot or sauce pan, heat the oil and add the garlic and onions. Cook until soft, about 1 minute. Add the pancetta and cook for another minute. Then add the rice and stir for 1 minute making sure the rice gets a good coating. Add wine and stir until most of the liquid is absorbed.
Add the mushrooms and season with salt and pepper. Start adding a ladle of stock and continue to stir.
Once most of the liquid is absorbed add another ladle of stock. Continue adding stock and stirring until the rice is al dente or has a slight crunch with a creamy consistency. Taste and add salt and pepper as needed. Remove pot from heat and add 2 tbsp of butter and the Parmesan cheese, stir to combine, cover and let sit for 5 minutes to thicken a bit and let the flavors come together Then the best part...enjoy your food!
Here is different version I came up with - Shrimp and zucchini - simple yet delicious. Prepared the same except add the shrimp and zucchini about a half of the way through cooking the rice.
Sunday, February 6, 2011
Home Made Lasagna
One of my favorite meals my mom cooked was her lasagna. I remember growing up looking forward to Sunday dinner sitting down with the family and enjoying this wonderful dish. Since I live so far away now I've had to learn how to make my own version. Now it's not my moms, but I've made a few tweaks here and there, I think she'd be proud. I don't want to toot my own horn but I must say it's pretty damn good!
1 lb lean ground beef
3 14 oz cans chopped tomatoes
1 medium onion chopped
3 garlic cloves chopped
1-2 tbsp dried oregano
1-2 tbsp dried basil
1 tbsp of sugar
2 bay leaves
Handful of fresh basil
S+P
1 egg
250 grams (approx 8 oz) Ricotta cheese
500 grams (approx 4 cups) shredded mozzarella cheese
I like to make my own pasta so here is the basic recipe.
In a large pot, heat a little EVOO and add the garlic and onion. Cook for 2 minutes then add the ground beef and brown. Drain if there is a lot of excess liquid. Add the cans of chopped tomatoes, dried oregano, basil, sugar, bay leaves and season with salt and pepper. Also add water to one of the cans filling it half way. Swirl it around and pour into the other cans making sure to get all the tomato sauce. Reduce heat and simmer for 30-45 min stirring occasionally. The longer it simmers will give more time to let all the flavors come out. Taste and adjust the seasoning if needed.
Preheat the oven to 375º
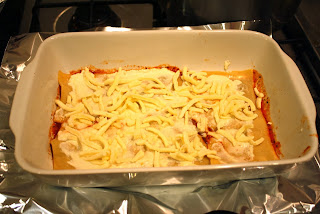
While the sauce is getting delicious it's time to roll out the dough into lasagna sheets. Once the sheets have been cut to fit the pan, it is time build it. I usually have about 5-6 layers of pasta, but you can have as much or as little as you like.
Beat the egg in with the ricotta. Place a couple spoonfuls of the sauce in the pan making sure it covers the bottom. Place a layer of your uncooked lasagna sheets on top. Add a bit of the ricotta and spread around, then add the mozzarella.
Add some more sauce to cover and then put some fresh basil on top. Add more lasagna sheets and repeat until the pan is full. On the last layer, I like to put just a little sauce on top so the pasta gets a little crunchy. Place on a cookie sheet lined with tin foil so the oven doesn't get all messy.
Bake for about 45-50 minutes, remove from oven and let sit for 5-10 minutes.
Subscribe to:
Posts (Atom)